Wednesday, November 21, 2012

Put a Skirt Around My Christmas Tree!!

Hey y'all!  It's been a crazy few weeks.  I've been working mad hours lately, having minimal time for crafting.  But, I managed to get this done, and I love it.  I can't wait to get my first real big-girl tree to put it around!!


My Hexie Tree Skirt!

The hardest part of this was figuring out the measurements.  I like to do my patterns on graph paper, I'm old-school like that.  It's a little hard to see.  But, you have to cut each piece of fabric  into a triangle.  If you have a triangle shape form, your angles will be 30°, 60°, and 90°.  I found it easiest to trace it on to a piece of poster board, and then I could cut my fabric off that pattern.  

The measurements of each triangle are: 24" x 13.86" x 27.7" - that's why it's easiest to measure out your angles. If you're not good at math... you might have to rewind your brain to high-school geometry.  I just knew that I wanted my final measurements to be 48" across.  That's how I got the 24".  Don't get crazy worrying about the math... there's lots of websites that will calculate lengths of sides for you, you just have to plug a couple numbers in. 


So obviously the hardest part of any project is to pick out your fabric.  For the tree skirt you will need: 


  • 6 different matching fabrics for your top pieces (I wish I could tell you how much you will need of each.  I always just buy a yard of everything, so it's hard to estimate.  You want these pieces to be at least 14" wide, so a 1/4 yard wouldn't work, but a 1/2 yard would, or anything bigger than that. 
  • Fabric for your binding (probably 3/4 yard or more, depending on how wide you want it)
  • Backing fabric - because the final size is 48" around, you'll need 2 yards to piece it all together
  • Matching ribbon - I used a 1" width, but you could go wider.  If you're buying by the yard, you'll just need about 1 yard. 


If you've sewn/quilted before, the rest is pretty self explanatory... but in summary:
  • Cut out all your triangles
  • Sew them together with a quarter inch seam (don't worry about the centers, since you'll be cutting them out for a hole for your tree) 
  • You want to make sure to leave one side open, which will go in the back of the tree, as you can see in the final product pictures.  It may seem as though your sides don't match up on your open seam, but don't worry, once you cut out the center and add the binding up the side, it will be just right.
  • Make your backing piece
  • Make your quilting sandwich, putting your backing fabric right-side down, then your batting, then your top.  Pin it all over to keep all the pieces in place.
  • Quilt it together.  You can use a walking foot if you have one.  I don't, and it manages to come out okay.  
  • Once you have the whole thing quilted, find something round and the right size for your opening in the center.  Trace it, and cut it out.  At this point, I zig-zag stitched around the center and just left it like that.


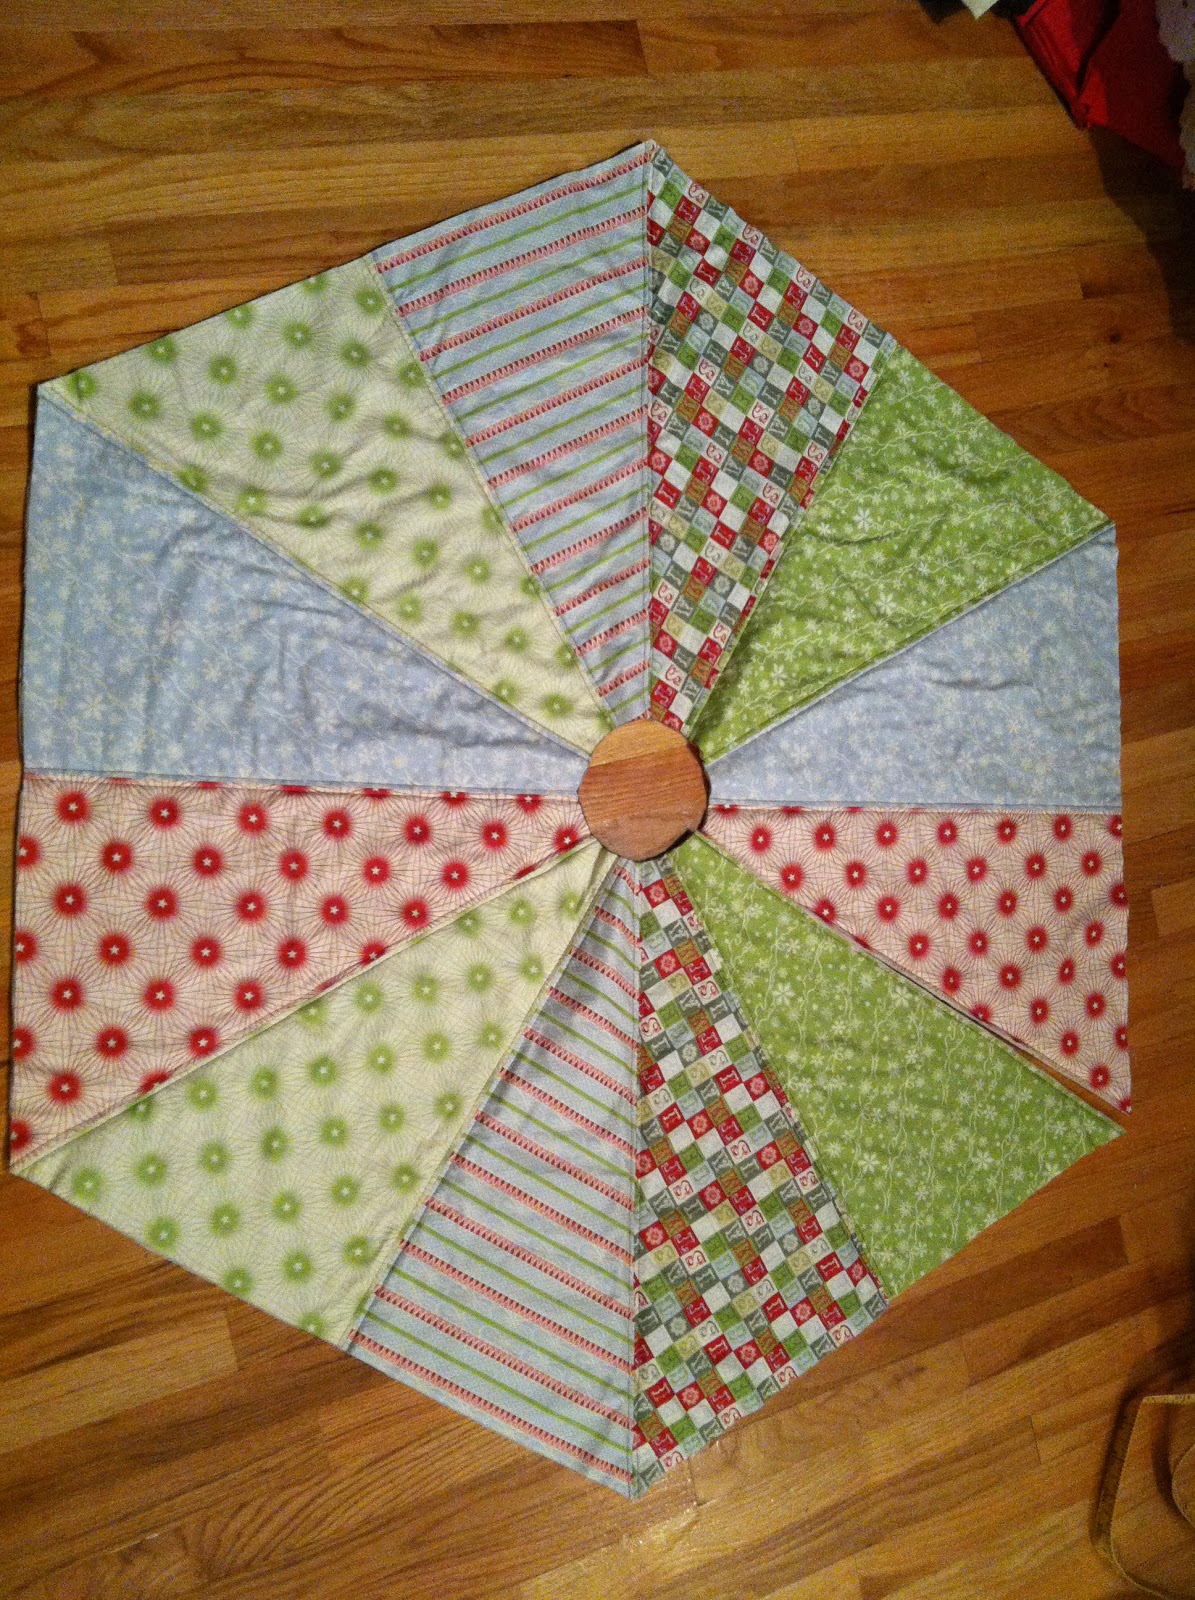
As you can see, I quilted a quarter inch off of each seam.  


  • Next you'll want to add on your binding.  Because of the fabric I chose, with the letters, I made my own double-fold bias tape.  There's lots of different ways to do bindings.  If you don't know how, I put a couple links at the bottom.  For this, I chose to run the binding all the way up the opening but I skipped the round opening because I didn't like the way the fabric got kind of bunched up around the circle.


  • The final step is totally optional.  But I think it adds a nice touch.  Cut your ribbon to a length long enough to be tied into a pretty bow.  You'll want 4 equal lengths.  Pin your ribbon onto the edges of your opening, spaced as you wish. 
  • Here, I sewed the ribbon on.


And just a repeat picture so you can see the final product again. :)


Here's a couple links:


Sunday, November 4, 2012

Monthly Give - November


Note:  This has nothing to do with butter, baking or crafts.  I'm branching out.

I've been seeing a lot of people on FB posting things that they're thankful for during the month of November. I like this idea, and it made me think about something that I used to do when I was living in Boston.  A friend of mine would organize a "monthly give", where every month she would choose a charity/organization/idea and her friends could come together and donate.  

This is my version.  I'm challenging all of my friends to participate with me.  November's monthly give will be donating dry goods or grocery gift cards to a food bank.  Since we all live in different areas, I'll list a couple food banks in different cities.  If you live in Maine, you can give me your donations and I will drop them all off before the end of the month.  (If I get a lot before Thanksgiving, I will make two drop-offs.)  Of course, if you want to make your own drop-off, feel free :)

I realize that it's hard to donate now, but even if it's just one or two boxes of food, every bit helps!  And, feel free to pass this on and challenge your own friends.  Let's start a movement. 

Here's a list of food banks:

Portland/Maine:
Good Shepherd Food-Bank

Boston:
Greater Boston Food-Bank

Or, Find a Food Bank in your Area

Sunday, September 23, 2012

Carrots and Boo's


There are not many people whom I would cut my hand on a cheese grater for.  In fact, I can count on one hand the number of non-family members I would do that for.  This girl is one of them.  Sometimes I call her "boo".


I offered to make a carrot cake for her birthday.  I also decided to make it a layer cake.  Can you believe that I've never made a layer cake before?  You know, with two layers of cake and frosting in the middle?  Nope, up until this point, I'd only ever made sheet cakes or cupcakes.  "How hard can it be?", I asked myself.


The answer, is not that hard.  Except for the grating of carrots.  That part stinks.  But other than that, this cake is mad easy to make.  I used the Pioneer Woman's recipe after searching around.  This recipe looked very simple and delicious, and I love the fact that the frosting has pecans in it.  


Here it is!


For the Carrot Cake:
2 cups white sugar
1 cup vegetable oil
4 whole eggs
2 cups all-purpose flour
1/2 tsp salt
1 tsp baking soda
1 tsp baking powder
1 tsp ground cinnamon
2ish cups grated carrots (I used 5 medium-sized carrots, which is a bit more than 2 cups)

For grating the carrots, I like to use the sort-of small side on the box grater.  This will allow the carrot shreds to blend in better and contribute to a homogeneous flavor of the cake, instead of having big chunks of carrots that really stick out.  And while you're grating, try not to cut your finger.  

Mix together the sugar, oil and eggs in a large mixing bowl. In another bowl whisk together flour, salt, baking powder, baking soda and cinnamon. Add to first mixture and combine. Then add carrots and mix well. Grease and flour your chosen pan(s), and pour your cake mixture into your pan(s).

Bake temp: 350°F
Bake time: For 2 9" round pans, I baked for about 35 minutes.  Ree from PW says that depending on the size of your pan, you can bake as little as 25 minutes and as many as 50.  The way to know when it's done is to give your pan a shimmy-shake and if it wiggles, it's not done. 

When the cakes are done baking, remove them from the oven and let cool completely.  If you're making a layer cake, once it's done, you have to level it so you have an even surface to work with.  (I've been told, however, that my Great-Grammy Sheehan never used to do this, she would just fill in the hole with frosting.)  You can decide what you want to do.  I chose to level.


The bonus of this method is that then you have a whole bunch of cake to "sample".

Then you have to make your frosting.  For a layer cake, Ree recommends doubling the recipe for frosting.  I found this to be a bit much, and in the future would probably just 1.5 it.  

Pecan Cream Cheese Frosting recipe:
1 package cream cheese (8oz) - softened to room temperature
1 stick butter - softened to room temperature
1 tsp vanilla
1 lb powdered sugar
3/4 cup chopped (really small) pecans

In your mixer, mix together the cream cheese, butter, and vanilla.  Add in the powdered sugar in two parts.  Let your mixer do all the work, and combine all the ingredients until the frosting is smooth.  Then add in your pecans.  


Then the fun part.  Line your cake plate (or whatever you're going to serve your cake on) with wax paper around the edge.  Plop your first cake layer down in the middle, and throw some frosting on there.  Using an off-set spatula, spread the frosting around to the edge.  It's okay if you go over a bit.  Encouraged, in fact.


Then put your second layer on top of that.  Continuing to use your off-set spatula, spread frosting around the top and edges of your cake.  


When you're done, slide the wax paper out from underneath your cake, and admire your work!


If you have a pretty cake plate with a cover, like I do, you can put the cover on.  Then figure out how to transport your cake in it's fancy dish.  Hmmmm.... 


Saturday, September 15, 2012

A Lazy Sunday Afternoon Project

I had been wanting to make these for a while... I had, in fact, already made one, but promptly gave it away, and then didn't have any for myself.  Then life got madd busy, and I haven't had any sewing time in weeks.

Regardless, yesterday, I finally got back to some "me-time", and whipped out a few.  They came out cute, no?


What are they, you ask?  They're re-usable baggies!  I use them for my bagel every day to bring to work.  I also put cookies in them, and if I ate sandwiches, I would put those in there too.  You can also put veggies or fruit in there, really anything!  The only draw-back is that they are not air tight, so if you leave things in there for too long, they can get stale.

Baggies are a great way to live green!


Monday, March 26, 2012

Summer Fever


Last week I didn't get much quilting done... I didn't get much of anything done, for that matter. We had a bit of Indian Summer in March, up here in Portland, Maine, so everyone went a little wacky and forgot all about their responsibilities. Things like finishing quilts, making dinner, cooking in general, all just fell by the wayside.


I went for a little walk at a place called Perkins Cove. PC is well known to myself and my family, we used to go there all the time when we were little. There is a great little candy store there, which was unfortunately closed, but brings back loads of childhood memories just by walking by.


There's also this lovely walk called the Marginal Way that winds through the woods and along the ocean. Divine. As we were walking, we came along a house under construction. They were building this really cool dome as part of the house.

I hope the owners don't mind, but I took some pics to show the architect when he designs my future beach house (haha). I'll have to go back to this house and see the progress. I like the lack of equality in it, all three parts are different shapes.

Plus, it didn't hurt to have that cute guy sitting up there!

This week we're back to March-in-Maine weather, so I better get some quilting done! I'm already behind!!

Hopefully summer gets here soon... I'm ready for the beach!

Thursday, March 15, 2012

Quilting is an Act of Love

I finished my second quilt. It was for my mom, and it equals love.

I used a pinwheel pattern. The blocks were made from a Moda Flora layer cake and a white paisley print. I love the yellow binding, it pops the outside really nicely. But the best part of the front, in my opinion, is the right side. I took one of my Grampy's neck-ties and stitched it to the front. I love the way it looks. Dummy me, however, never took a close-up picture of the tie. Duh. But, I machine stitched it on, adjusting the zig-zag stitch closeness so that it is very close, and looks almost hand-stitched, except much more even. It also goes through the 3 layers of the quilt, so the thread is on the back. I think it looks cool.

The back uses three different fabrics. The top corner fabric is another one that is special to my family. We are in the process of cleaning out my Grandparents' house that they have lived in for 50+ years. In the basement we found bags and bags of fabric scraps. Quilter's dream. This purpley-pinkish fabric was used for cushions on their sun-room porch. It's hideous, it reminds me of the 90's, and I love it. I was glad that I could sneak it into the quilt so we'll have the reminder forever. The cushions and wicker furniture will probably go to charity, so maybe some other family will enjoy this fabric for years to come.

Some things I have learned while working on this quilt:
1. One should always think your measurements all the way through in terms of space available at your house. You might not have enough room to spread out all your fabric.

2. I can make a quilt in 35 episodes of "24".

3. My living room is not as big as I thought it was.

4. I have so many more quilts that I want to make!!

5. As you can see from the background in this picture... I have a lot of junk!

6. I'm not ready to machine quilt just yet... I'm still tacking, but hopefully I'll get the courage to try it out on my next one!


Inspiration:
Moda Jack's Hills
Pinwheel Baby Quilt

Thanks:
Special thanks to my favorite photographer, Dermot Conlan, for taking a detour from his normal photography to snap a couple shots of the quilt! Hopefully I'll get a non-iphone camera soon and can take my own pictures!

Tuesday, March 6, 2012

Makin' Plans, Makin' Paper


I'm starting my third quilt this week. At this rate, I'll do one quilt a month (that's the goal, anyways). I hope all my loved ones like quilts! I haven't posted the 2nd one yet because it's for my mom - don't worry, she already knows about it, just hasn't seen it - and I won't get to give it to her until Thursday. But don't worry, it's awesome!! I can't wait to share...

In the meantime, I made my first quilt pattern this morning. I got the inspiration from this website, but they didn't have measurements, and the picture was a baby quilt, which is not what I'm making. So here's my pattern:

I'm pretty sure you can click on the image to make it bigger. This size is for a lap quilt. If you're going to use it, don't forget to add a quarter inch to each side for your seams! This quilt would be nice with fabrics with big patterns, so that you can see the whole pattern.

I also found this link, which I find to be very helpful. I has references for different quilt sizes, and how much fabric you would get/need for various sized quilts/squares. Very useful.

Alright, time to get cutting!